
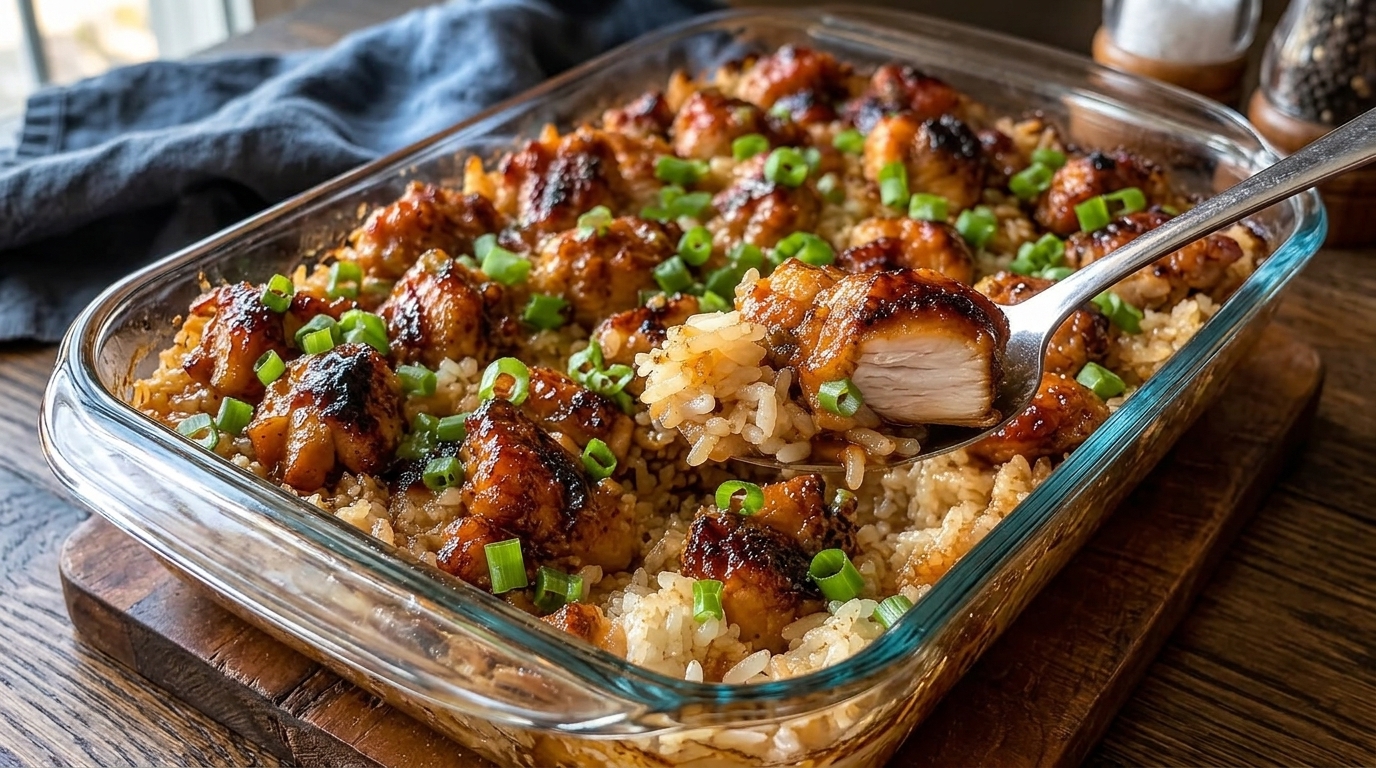
When weeknight busyness hits, nothing saves dinner quite like a one-pan casserole where protein, grains, and sauce cook together in sweet, savory harmony. This Honey Garlic Chicken Rice Bake is the ultimate solution for hassle-free cooking. Juicy chicken thighs are nestled into a bed of fragrant jasmine rice, then drenched in a homemade honey garlic soy sauce that infuses every single grain of rice as it bakes in the oven.
The true magic of this dish lies in its simplicity and efficiency. Instead of dirtying multiple pots and pans to sear meat, boil rice, and simmer a sauce, everything cooks together inside a single baking dish. As the casserole bakes under a tight seal of foil, the rice absorbs the rich chicken broth and honey garlic glaze, while the chicken cooks to tender, succulent perfection. A quick broil at the very end caramelizes the sticky glaze on top of the chicken skin, giving you restaurant-quality flavor with virtually no cleanup.
| Recipe At-a-Glance | Details |
| Prep Time | 15 minutes |
| Cook Time | 45 minutes |
| Broil Time | 3 to 5 minutes |
| Total Time | 1 hour |
| Servings | 5 to 6 servings |
| Course | Main Dish |
| Cuisine | Asian-Inspired / American Comfort |
Why You Will Love This One-Pan Meal
- Minimal Cleanup: Cooking the raw rice and chicken together in one pan means you only have a single baking dish to wash after dinner.
- Infused Flavor: Because the rice cooks directly in the honey garlic broth and chicken drippings, every bite is packed with sweet, savory, and aromatic garlic flavors.
- Budget-Friendly Protein: Bone-in or boneless chicken thighs are economical, forgiving to cook, and remain juicy throughout the baking process.
- Crowd-Pleasing Taste Profile: The balance of sticky wildflower honey, savory soy sauce, fresh garlic, and toasted sesame oil is a hit with both kids and adults alike.
Essential Kitchen Equipment
Having the right tools ready ensures your bake turns out perfectly cooked without dry rice or burnt edges:
- 9×13-Inch Baking Dish: Glass, ceramic, or metal baking pans work well. Ceramic or cast-iron casserole dishes distribute heat most evenly.
- Heavy-Duty Aluminum Foil: Creating a tight seal over the baking dish is critical. The foil traps steam inside, which is what cooks the raw rice through.
- Whisk & Measuring Pitcher: For blending the honey, soy sauce, garlic, and broth into a smooth liquid base.
- Fine-Mesh Strainer: Essential for rinsing starch off the raw rice before adding it to the pan.
Ingredients & Substitution Guide
This recipe uses everyday pantry staples to create a deep, complex, takeout-style glaze and fluffy rice bed.
| Ingredient | Quantity | Purpose & Substitution Notes |
| Chicken Thighs | 2 to 2.5 lbs (5–6 pieces) | Bone-in, skin-on thighs yield maximum juiciness and flavor. Boneless thighs or skinless breasts also work (adjust cook time down slightly for breasts). |
| Long-Grain White Rice | 1.5 cups | Jasmine or Basmati rice work best. Uncooked rice absorbs the broth evenly without becoming gummy. |
| Chicken Broth | 2.5 cups | Low-sodium chicken broth gives you control over the overall saltiness of the dish. |
| Honey | 1/3 cup | Liquid honey creates the signature sticky sweetness and helps caramelize the chicken under the broiler. |
| Low-Sodium Soy Sauce | 1/3 cup | Provides savory umami depth. Use Tamari or Coconut Aminos for a gluten-free option. |
| Fresh Garlic | 6 cloves, minced | Do not skimp on garlic! Freshly minced garlic provides the punchy aromatic base. |
| Toasted Sesame Oil | 1 tbsp | Adds a nutty, rich aroma that elevates the overall sauce profile. |
| Apple Cider Vinegar | 1 tbsp | Cuts through the heavy sweetness of the honey and balances the savory soy sauce. |
| Ground Ginger | 1/2 tsp | Adds a subtle warm spice background. 1 tsp of fresh grated ginger can be used instead. |
| Unsalted Butter | 2 tbsp, melted | Stirred into the rice and broth base for extra richness and individual grain separation. |
| Salt & Black Pepper | To taste | Used to season the chicken skin before layering. |
| Green Onions & Sesame Seeds | For garnish | Adds freshness, crunch, and visual appeal before serving. |
Step-by-Step Cooking Instructions
Step 1: Prep the Oven and Season the Chicken
Preheat your oven to 375°F (190°C). Grease a 9×13-inch baking dish lightly with cooking spray or butter. Pat the chicken thighs completely dry with paper towels—removing excess surface moisture helps the skin crisp up later. Season both sides of the chicken thighs with kosher salt, black pepper, and a light pinch of garlic powder.
Step 2: Rinse and Layer the Rice
Place the long-grain white rice in a fine-mesh strainer and rinse under cold tap water for about 30 seconds until the water runs clear. This step removes excess surface starches, preventing the baked rice from becoming clumpy or mushy.
Spread the rinsed, drained rice evenly across the bottom of your prepared 9×13-inch baking dish. Drizzle the melted butter over the raw rice and toss gently to coat the grains.
Step 3: Whisk the Honey Garlic Sauce Base
In a large measuring cup or mixing bowl, whisk together the chicken broth, low-sodium soy sauce, honey, minced garlic, apple cider vinegar, toasted sesame oil, and ground ginger until the honey is fully dissolved into the liquid.
Carefully pour about two-thirds of this liquid mixture directly over the raw rice in the baking dish. Gently stir the rice in the pan to ensure it is evenly submerged in the liquid and spread out in an even layer.
Step 4: Layer the Chicken and Add Remaining Sauce
Arrange the seasoned chicken thighs on top of the rice and broth mixture, skin-side up. Make sure the chicken pieces are spread out in a single layer rather than overlapping.
Spoon or pour the remaining one-third of the honey garlic sauce directly over the top of each chicken thigh so the meat and skin are thoroughly coated in glaze.
Step 5: Seal Tightly and Bake
Cover the baking dish very tightly with heavy-duty aluminum foil. Crimp the edges tightly around the rim of the pan so no steam can escape. Note: A tight foil seal is the secret to perfectly fluffy rice—if steam escapes, the top layer of rice will remain hard and undercooked.
Bake in the preheated oven at 375°F for 40 to 45 minutes, until the rice has absorbed the liquid and the chicken reaches an internal temperature of 165°F (74°C) at its thickest point.
Step 6: Broil for Sticky Caramelized Skin
Carefully remove the aluminum foil from the baking dish (be cautious of hot escaping steam!). Turn your oven setting to BROIL on High.
Place the uncovered baking dish back into the oven on the top rack, about 6 inches below the broiler element. Broil for 3 to 5 minutes, watching constantly, until the honey garlic glaze on the chicken skin turns sticky, bubbly, and dark golden brown with slightly charred edges.
Step 7: Fluff and Serve
Remove the dish from the oven and let it rest for 5 minutes. Carefully lift the chicken thighs onto a clean plate or cutting board. Use a fork to gently fluff the hot honey garlic rice underneath, incorporating any rich sauce drippings left in the bottom of the pan.
Return the chicken thighs to the top of the fluffy rice. Garnish generously with thinly sliced green onions and toasted sesame seeds before serving warm.
Pro Culinary Tips for Flawless Results
- Rinse Your Rice: Skipping the rice-rinsing step is the number one reason casserole rice turns out gummy or sticky. Rinsing strips away loose starch so every grain bakes up fluffy and distinct.
- Don’t Use Minute Rice or Brown Rice Without Adjustments: Instant rice will turn to mush during a 45-minute bake, whereas brown rice requires significantly more liquid and nearly double the baking time. Stick to standard long-grain white, Jasmine, or Basmati rice for this specific recipe setup.
- Crimp the Foil Extra Tight: The liquid in the pan needs steam to cook the rice grains through. Double-wrap the dish with foil if your foil sheets are narrow, making sure there are no open gaps around the corners.
- Check Internal Temperature: Bone-in chicken thighs are best cooked to an internal temperature of 175°F to 185°F. Unlike chicken breasts, thigh meat becomes even more tender and juicy at higher temperatures as collagen breaks down.
Creative Recipe Variations
- Add Fresh Vegetables: Toss 1.5 cups of fresh broccoli florets, diced bell peppers, or sliced carrots into the rice layer before baking. Tip: Cut vegetables into medium-large pieces so they don’t get too soft during the 45-minute bake.
- Spicy Honey Garlic Kick: Add 1 to 2 tablespoons of Sriracha sauce or 1/2 teaspoon of crushed red pepper flakes into the honey garlic liquid base for a sweet-and-spicy “swicy” twist.
- Pineapple Honey Garlic Bake: Replace 1/2 cup of the chicken broth with pineapple juice, and scatter 1 cup of drained pineapple tidbits into the rice layer for a tropical flavor addition.
- Boneless Skinless Chicken Option: If using boneless, skinless chicken breasts or thighs, reduce the initial covered baking time to 30–35 minutes so the leaner meat does not dry out.
Ideal Side Dishes and Serving Options
Because this casserole contains both your protein and starch in one pan, pairing it with light, vibrant vegetable sides creates a complete, balanced meal:
- Steamed or Roasted Veggies: Garlic-sauteed snap peas, steamed edamame, roasted baby bok choy, or charred broccoli florets.
- Fresh Asian-Inspired Slaw: A crisp cabbage slaw dressed in a light rice vinegar and sesame oil dressing cuts through the rich sweetness of the honey glaze.
- Fresh Cucumber Salad: Thinly sliced cucumbers tossed in rice vinegar, soy sauce, and a pinch of sugar offer a refreshing, cooling contrast.
Storage, Reheating & Meal Prep Guidelines
- Refrigerator Storage: Allow leftovers to cool to room temperature. Transfer the chicken and rice into airtight food storage containers and keep refrigerated for up to 3 to 4 days.
- Meal Prep Advantage: This dish is exceptionally friendly for weekly meal prep. The rice continues to absorb the savory honey garlic flavors as it sits, making day-two leftovers taste even better!
- Reheating in the Microwave: Place a portion of rice and chicken on a microwave-safe plate. Cover with a damp paper towel to trap steam and microwave on high for 1.5 to 2 minutes, stirring the rice halfway through.
- Reheating in the Oven: Place leftover chicken and rice into an oven-safe dish, add 2 tablespoons of chicken broth or water over the rice to restore moisture, cover with foil, and bake at 350°F (175°C) for 15 to 20 minutes until piping hot.
- Freezer Instructions: Cooked honey garlic chicken and rice can be frozen in airtight containers for up to 2 months. Thaw overnight in the refrigerator before reheating.
Estimated Nutritional Information
| Nutrient | Per Serving (1 Thigh + Rice) |
| Calories | 520 kcal |
| Protein | 34 g |
| Carbohydrates | 56 g |
| Fat | 16 g |
| Saturated Fat | 5 g |
| Cholesterol | 110 mg |
| Sodium | 720 mg |
| Dietary Fiber | 1.5 g |
| Sugar | 16 g |
(Note: Nutritional values are estimates based on standard recipe ingredients using 6 bone-in chicken thighs. Exact values may vary depending on protein cuts and specific sauce brands used.)